DIY Chevron Fabric Covered Ottoman
I just switched out my sofa covers to usher in that brightness that spring brings. I gave a few teasers on my Instagram feed about my DIY Chevron Fabric Covered Ottoman.
Spring is in the air and it’s time to dust away the cobwebs and open the windows!
I’m so excited to share the reveal with y’all today.
But you gotta start with the beginning.
Oy!
Let me just say I love my ottoman. We purchased it about 10 years ago at Costco and have kept it throughout the past few cross country moves.
I actually am surprised that it survived all the abuse it’s seen between those moves and my boys!
Now, I don’t know about you, but we’re a ‘snuggle on the couch with our feet propped up’ kinda family. And this padded ottoman has been perfect for us for the past decade.
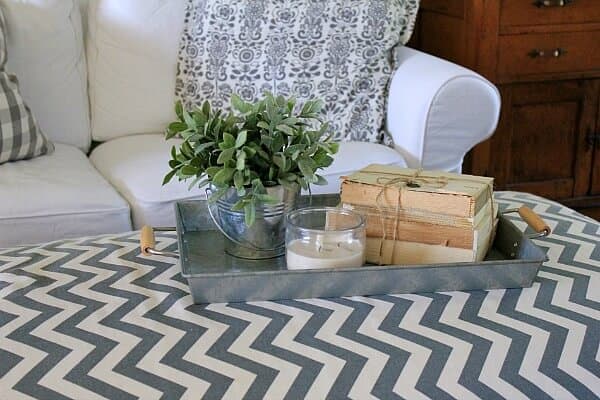
What I love most about my ottoman is that it has a secret!
It’s the little tray that slides out.
Eee! How cute is that? It’s light it’s my secret compartment in my spy home, only it’s just a tray.
It’s perfect for drinks when company is over. Or for the kids to occasionally have a snack in front of the TV without momma going into one of her fits about messing up the couch. (Especially when the slipcovers are white!)
So while it survived the abuse it’s received, we noticed after our last cross-country move that the ottoman has sadly seen better days.
The leather was starting to wear and the piping was pulling away.
When this huge rip happened, I knew it was time to recover it.
The top easily came right off after removing the screws, leaving the leather base that held the tray and the legs. Updating the top was a cinch. I removed the old leather, added some padding and batting I had left over from some sound panels we made for our music room. Then I was able to staple it all together.
I opted not to tuft the top, since my boys still like to pick at things!
And honestly, it seemed a bit daunting,
I painted the legs white and added Valspar antiquing glaze to bring out the character of the spiral twists.
How cute!
While covering the top was easy, I just could not figure out what to do with that leather base.
Using leftover burlap ribbon from Christmas, I simply wrapped and stapled the ribbon around the leather base.
Then I added some braided jute where the base and top met. Using liquid nails, I attached it to the fabric and top of the burlap wrapped base.
After painting the pull out tray with the same paint, I glazed using the same technique I used for the legs.
I absolutely love how the burlap and Chevron look together. But to be perfectly honest, I am expecting to have to replace the burlap at some point.
It won’t last long with my pick-at-things boys.
I love how this DIY Chevron Fabric Covered Ottoman looks and how easy it was to do!
So after switching out the sofa covers – I absolutely swooned with how it pops against the white covers!


Hi Francie!
The slipcovers are part of the ikea couches. You can get different colors that fit their Ektorp series. Hope that helps and thanks for stopping by!
Jen
Jen,
Where did you find the slip covers for your couch? They fit so well & made an amazing decorative transformation!
Thanks, Francie
Lisa, your compliments are always so sweet. Thank you for stopping by. Hope you enjoy your week!
Thanks, Sam!!
Let me know if you do! I'd love to see a pic. Good luck on your project and thanks for stopping by.
Thanks, Wendi. I really hope the burlap holds up! I'm so glad you stopped by. Enjoy your week!
Thanks so much, Pat! I'm so glad you stopped by!
Such a gorgeous transformation! It is wonderful you were able to hold onto a much loved piece of furniture, but give it a fresh new look!
Wow what a difference! A really great transformation, I like that you found a way round a problem and added the burlap strip – very resourceful!
Your room and Chevron Ottoman are beautiful! I recently purchased a large wooden box and plan to use it as an ottoman. I may choose chevron too!
So creative! I'd want to keep that awesome ottoman too, love the tray feature! Super choice on recovering it, especially with the burlap around the sides. Pinning! XO-Wendi @H2oBungalow
Jen,
I love the chevron fabric on your ottoman and the burlap trim!
This piece looks amazing with both sets of slipcovers!
Amazing transformation!
Fondly,
Pat